Easy Homemade Pie Crust Recipe
As an Amazon Associate, I earn from qualifying purchases. Read the full disclosure here.
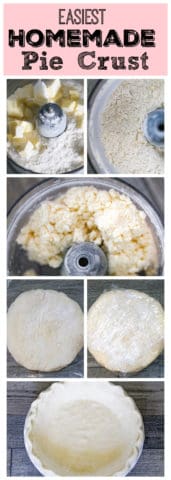
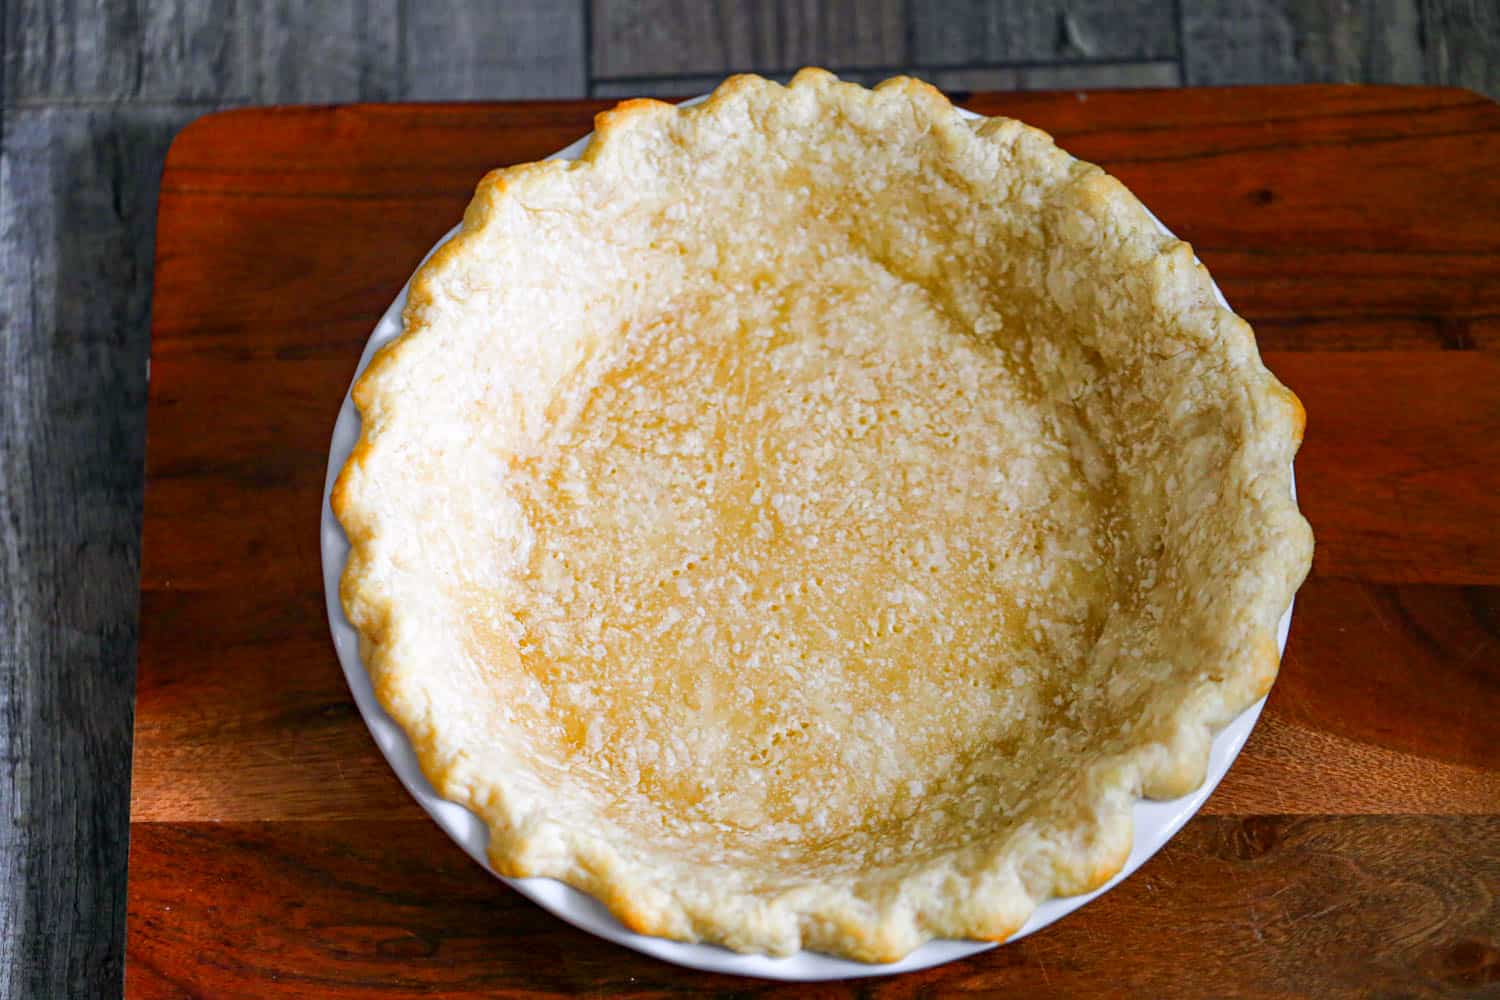
Our delicious, homemade Easy Homemade Pie Crust has a pretty golden color and has tender, flaky layers and buttery flavor throughout with great flavor. With this simple recipe, you’ll be making delicious, homemade pie crusts in no time right at home!
Loving the pie vibe? You’ll love our Creamy Custard Pie, Easy Mini Pumpkin Pies, Amish Peanut Butter Cream Pie, and our Reese’s Peanut Butter Pie for starters!
WANT TO SAVE THIS RECIPE?
Why We Love This Easy Pie Crust Recipe!
If you’re one of those people who freak out even thinking about baking pie dough from scratch, our foolproof pie crust recipe uses a food processor to make a pie dough that’s super easy to work with and it bakes up beautifully!
Making pie dough from scratch shouldn’t be frightening. Trust me, I used to be one of these frightened people. I’m so over it now that I have this recipe to rock and roll out some easy pie dough! We’re going for convenient and economical too, because making a batch of pie dough is quicker than making a trip to the store.
I like using my food processor, but if you don’t have a food processor, don’t fret! A stand mixer

Pie Crust Ingredients
- Butter, Crisco
, all-purpose flour
, chilled water, salt, cornstarch, and white vinegar is all you need to make this perfectly delicious pie crust. However, you can make this an all butter crust, no problem by omitting the shortening. The butter crust is a little harder to work with if it gets a little warm. It’s imperative you have the dough chilled so you don’t get shrinkage. No one likes shrinkage, do they? 🙂
- Make sure to use unsalted butter to regulate the salt content and have a cleaner, more natural flavor than salted butter. If you use the shortening, it will soften the dough and make it easier to roll and makes it a little more tender than the butter. Either way, you won’t be disappointed. I’ve tried both and they both are amazing!
- As far as water, you want just enough to make the dough come together. With the addition of vinegar it also tenderizes the dough.
- Cornstarch also makes the crust a little more tender. It makes a small but worthwhile contribution.
- Always make sure all the ingredients are well chilled when preparing the dough to get the best results and to make sure you don’t overwork the dough. That will lead to a tough crust. No thanks!
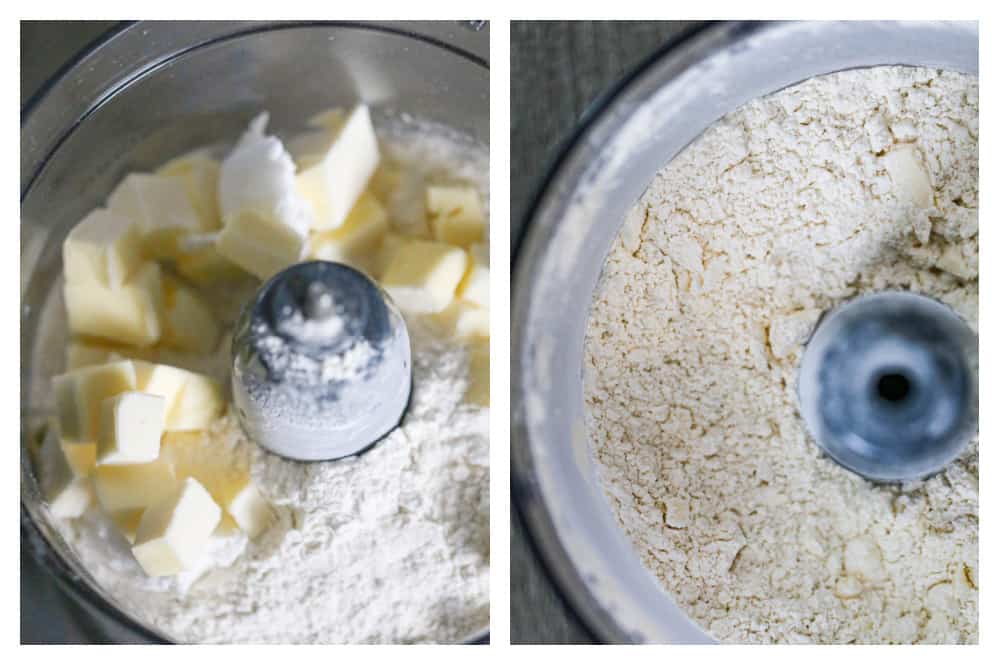
Using a Food Processor
If there’s one reason to own a food processor
Nothing else out there is as efficient or as consistent at cutting fat into flour when you want an easy homemade pie crust recipe! Of course, if you don’t have a food processor, you can use a pastry cutter or mixer as well.
How to Make Easy Homemade Pie Crust
To Start
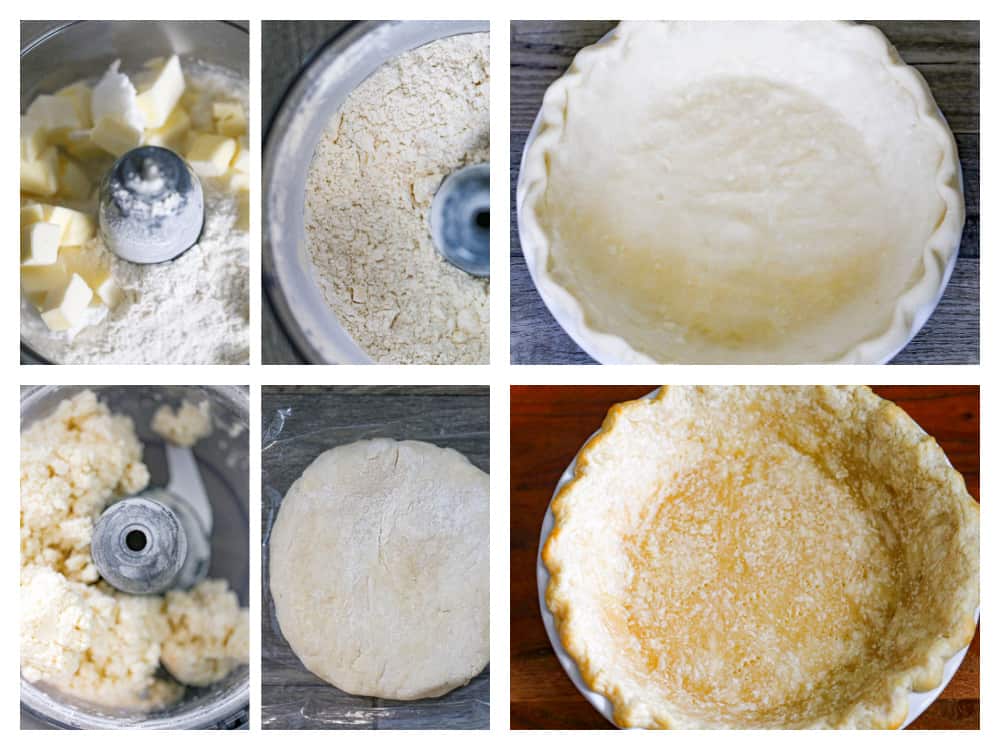
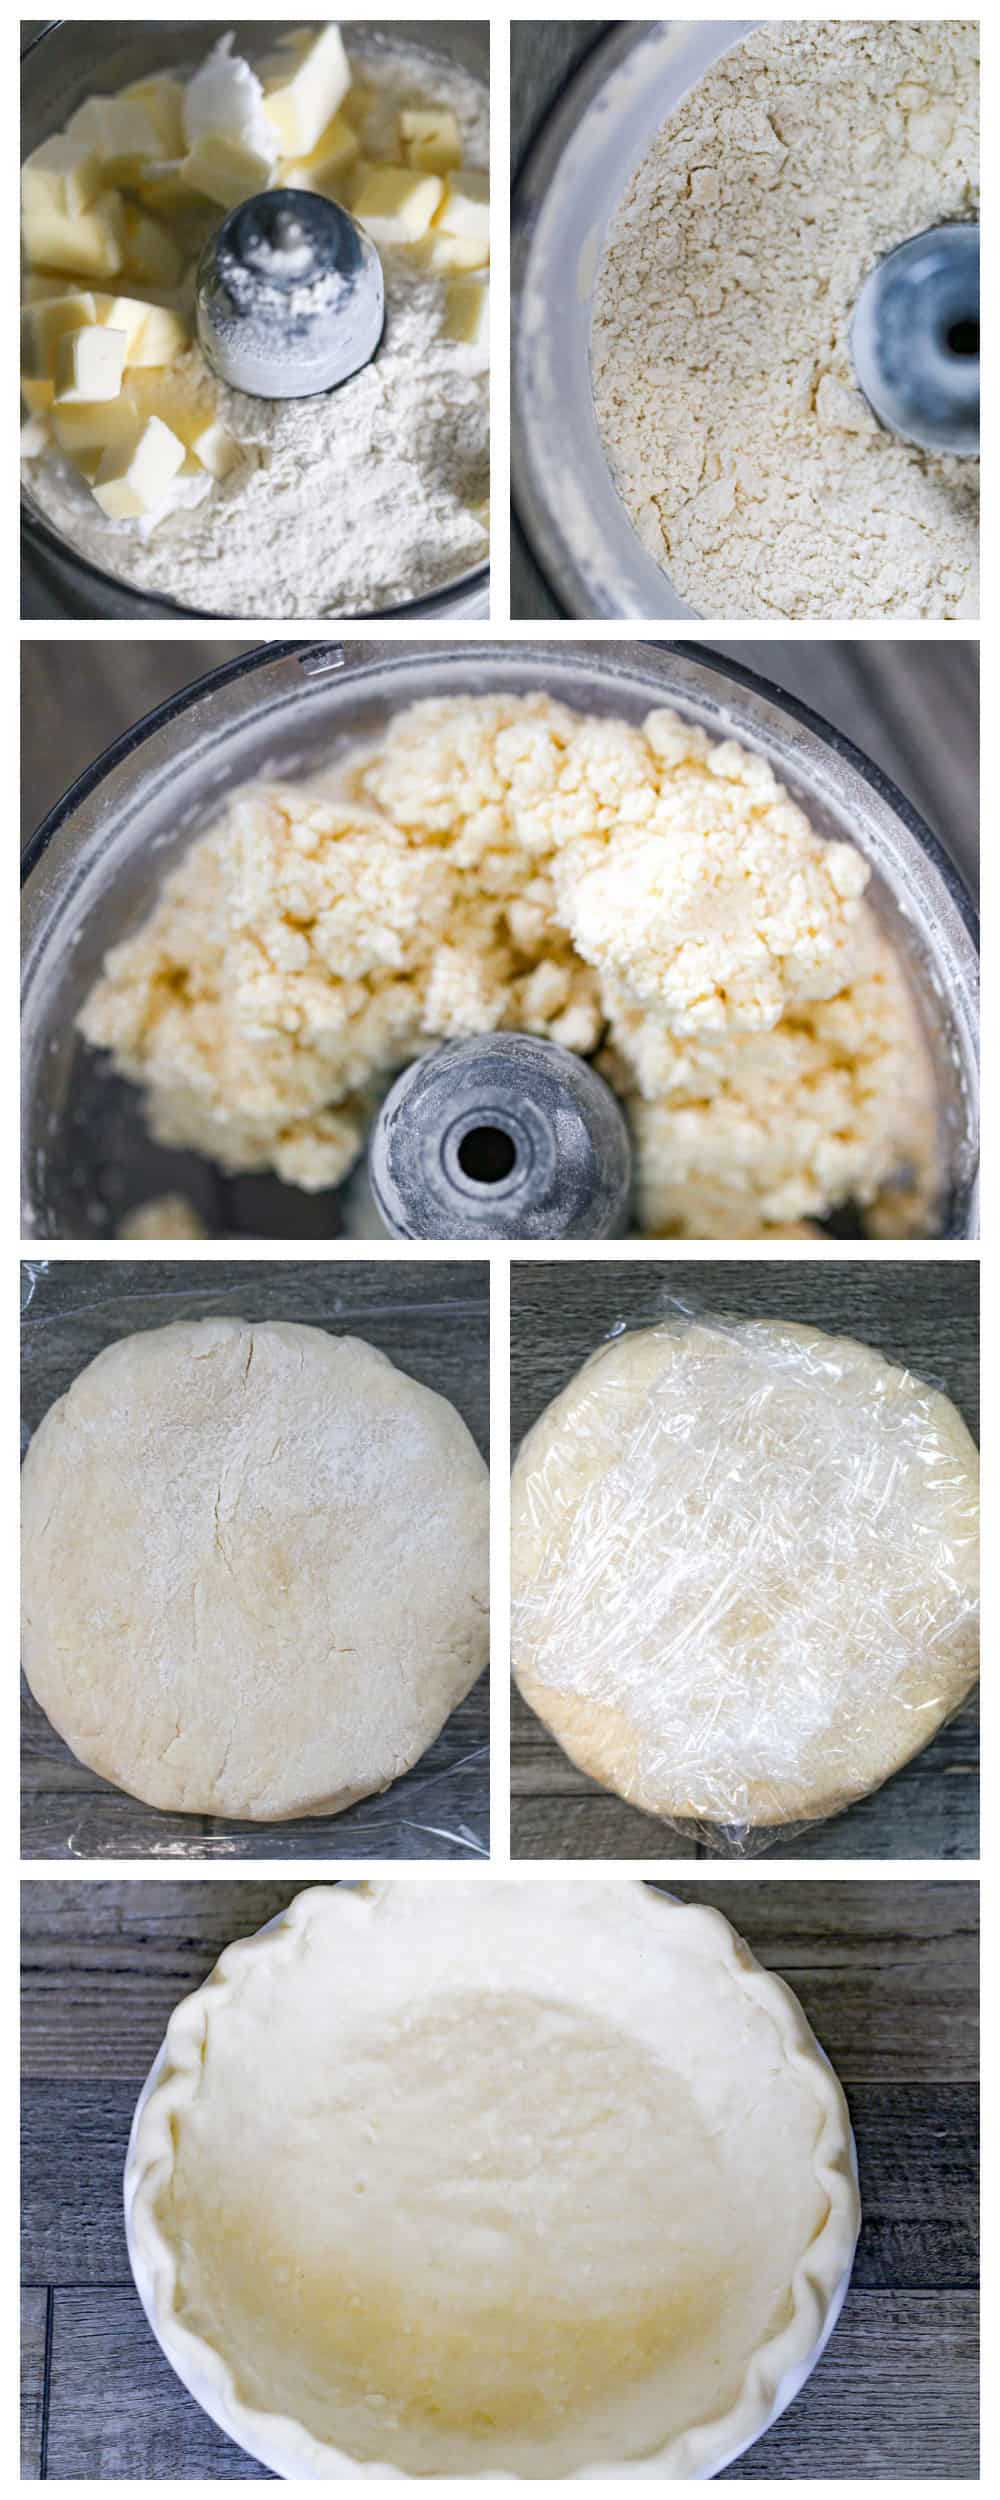
- Whisk together the flour, cornstarch and salt in a small bowl.
- Scatter the butter/crisco cubes on a large flour-dusted plate.
- Measure the cold water and add the vinegar to it.
- Place everything in the fridge for 10-15 minutes to chill up.
Making the crust
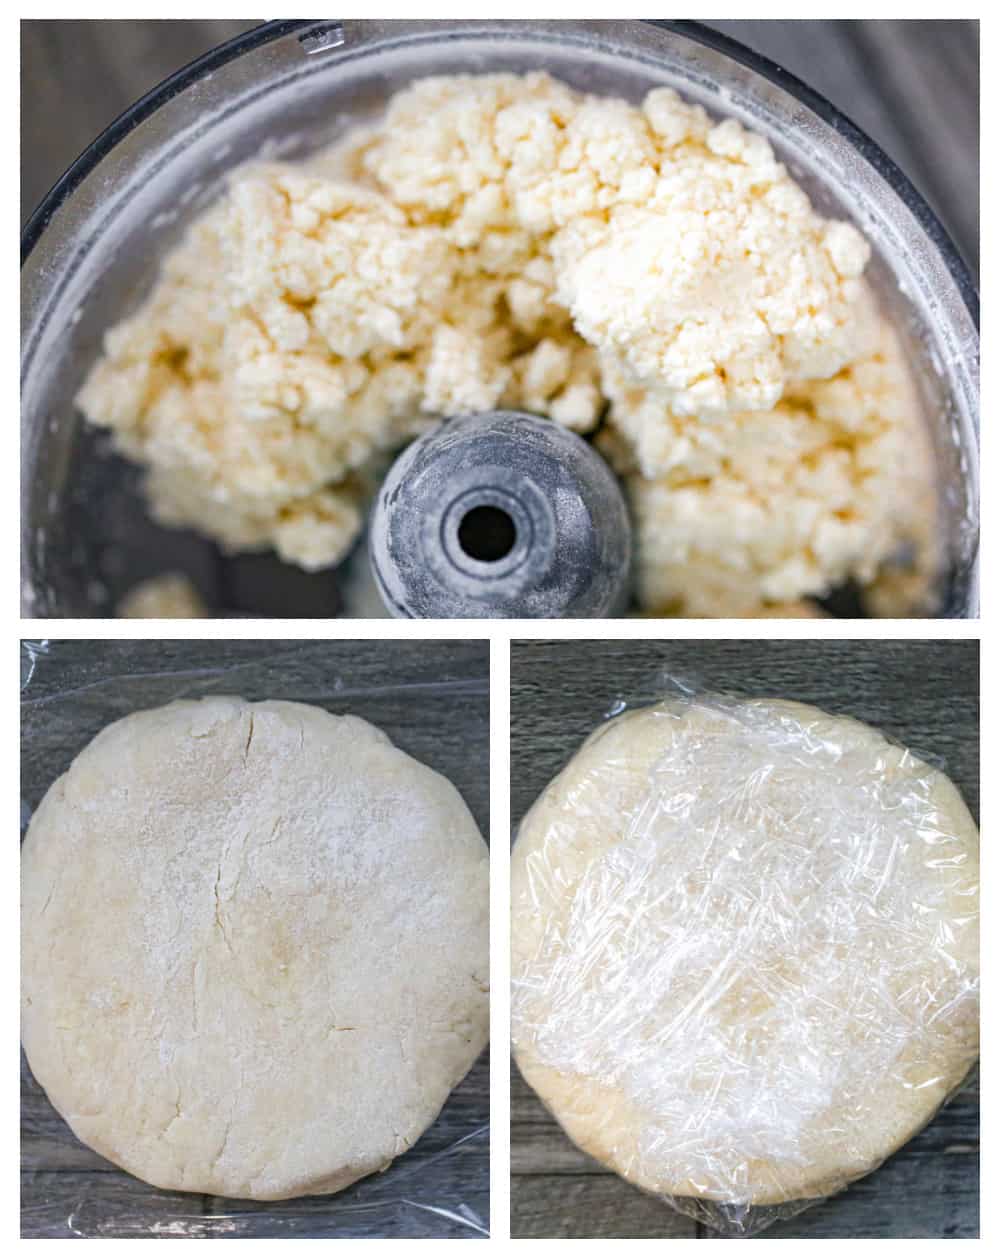
- Transfer the dry ingredients to the food processor. Add the butter/Crisco, then pulse the machine 6-7 times, until the pieces of fat are roughly the size of small peas. BTW…The bigger the butter chunks, the flakier your pie will be. If you love the look of super flaky dough, that almost looks like puff pastry, leave at least some of your butter chunks the size of a marble. Though there is a limit for how big to leave your butter pieces, so take care to only leave a few pieces the size of a marble.
- Pour the vinegar-water mixture through the feed tube in a 7-8 second stream, pulsing the machine as you add it. Stop pulsing when the mixture is just starting to form larger clumps.
- Turn the dough out onto your work surface and pack it into a ball. Put the dough on a sheet of plastic wrap and flatten it into a ¾ inch thick disc. Wrap the disc and refrigerate for at least one hour before rolling. (Pie dough can be refrigerated for up to 3 days, as long as it’s well wrapped in plastic.)
- I like to use my silicone pastry mat with parchment paper on top of the mat, but any counter surface will work. Dust your work surface with flour, before you begin rolling the dough. Dust the top of the dough and the rolling pin as needed, to prevent the dough from sticking.
You can also learn how to make a Homemade Gluten Free Pie Crust if you’re looking for a tried and true gluten free pie crust recipe that gets rave reviews!
Flattening the Dough & Rolling it
- Rock over the dough a few times with your rolling pin and begin rolling it from the center out. Give the dough a quarter turn, then repeat the rolling sequence and keep repeating. Roll the dough out into a 12-13 inch circle using medium pressure, not too hard and too little.
- For deep dish make it 12 ½ to 13 inches in diameter. For standard 9 – 9 ½ inch pie pan, a 12 inch circle will do nicely.
- If there’s any lingering flour on the dough, once it’s rolled out, take a pastry brush and brush the excess flour off the dough quickly, as the longer the dough stays at room temperature, the more difficult it is to handle.
Turn the Dough into the Pie Pan
- Simply run your hands under the dough, then lift into the pan without stretching and tearing. You can also rest the dough at the end of dough and roll the dough onto the pin. Posting the pin over one edge of the pan, then unroll the dough into the pan.
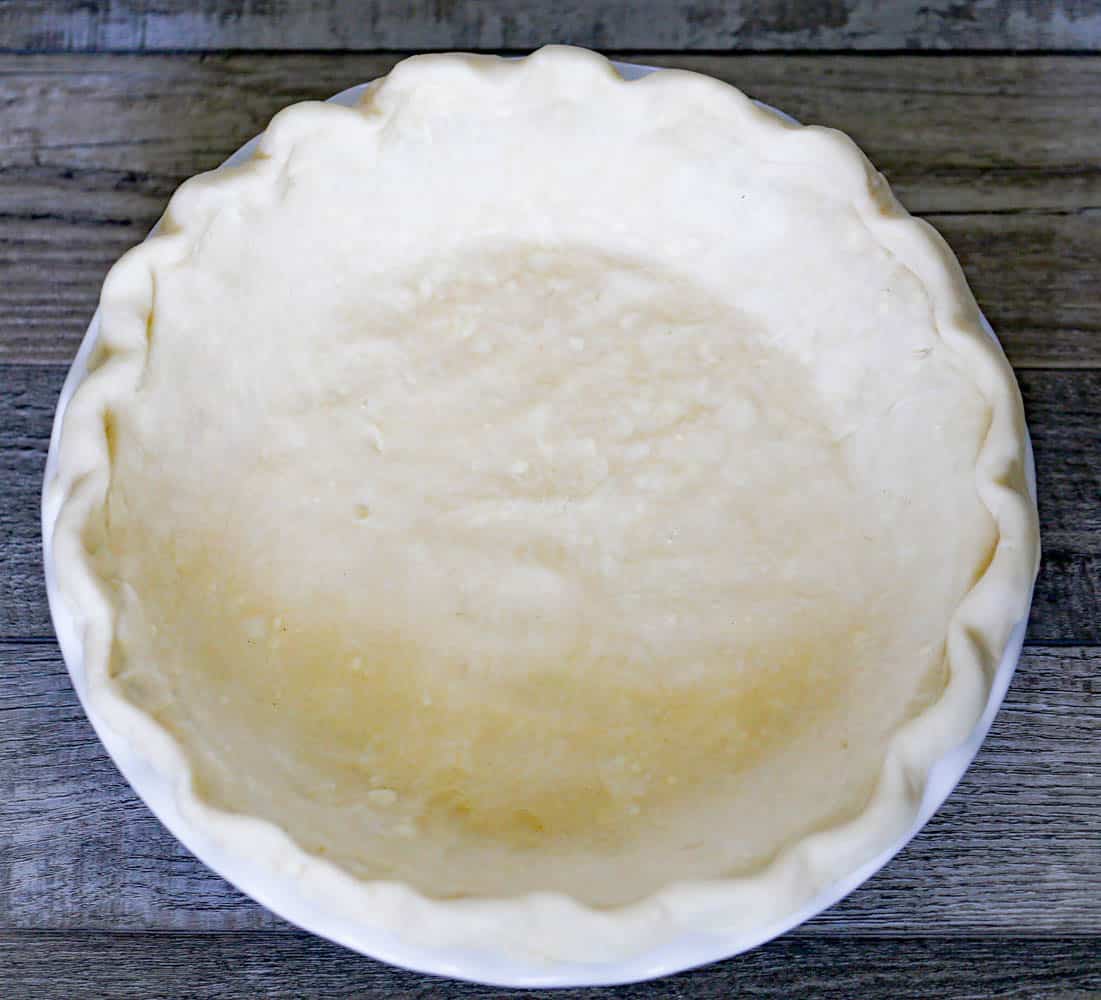
- Make sure the dough is draped evenly over the pan. Gently nudge the dough down the sides of the pan and crease at the bottom. Do this gradually working your way around as you go. You want an overhand of about ½ inch to ¾ inch all around.
How To Flute the Edge
- Starting anywhere along the edge, taking the overhanging dough and fold it under toward the outside of the pan so any seam is hidden. As you fold, pinch the dough together while you sculpt it into an upright ridge ½ to ¾ inches high. Work your way around the edge until you are done.
- Place the shell into the freezer for 5-6 minutes to firm up the ridge. This helps the flutes to hold their shape easier.
- To create the flute, form a V with the thumb and forefinger of one hand against the outside of the rim. With your other forefinger or thumb, press against the shell from the other side, pushing the dough in the V. Continue around the perimeter. Cover with plastic wrap and refrigerate the shell for 15 minutes minimum before filling or blind-baking.
- If you need to prebake the shell, poke the bottom 7-8 times with a fork. When you poke, twist the fork slightly from side to side to enlarge the holes, as small homes tend to close up when prebaking to vent and allow trapped steam to escape when you remove pie weights or dry beans.
For Freezing Easy Homemade Pie Crust Recipe
- Overwrap the shell with two layers of plastic and freeze until needed. When you’re ready to use the shell, transfer it to the fridge or leave at room temperature until the overhang is flexible enough to shape without breaking or tearing.
Blind Baking Tips
- Blind baking refers to the process of pre-baking the pie shell either partially or fully. Pies that benefit the most for partially pre-baking include pumpkin, custard, pecan, chess and sweet potato, just to name a few.
- Certain pie shells need to be fully prebaked when no further baking is needed for pies, most notably cream pies. That’s when the filling is cooked separately, then added to the shell.
To Weigh Down the Crust
- The first step is to weigh down the crust so it doesn’t balloon up in the oven. If it puffs up, it may not brown properly and it becomes misshapened, so it may not hold the filling properly.
- Line the shell with foil, very large coffee filters or parchment paper by nudging it evenly into the pan without disrupting the pie shell. Leave the overhang of the foil or parchment paper on opposite sides and fold it down like wings that you can grab and then place the pie pan onto a baking sheet lined with parchment paper. Add enough dried beans or pie weights about 2/3rds full, and level them out evenly, especially up and around the sides.
Baking the Easy Homemade Pie Crust
- Before baking, adjust the racks in the oven. One rack should be in the bottom position and another in the middle. Preheat the oven to 375 degrees, unless noted otherwise in a recipe.
- Make sure you place your pie shell on a baking sheet lined with parchment paper to soak up any leaking butter once it starts baking and to avoid any messes.
For Partially Pre-baked Pie Shells (pumpkin, custard, pecan, chess, and sweet potato)
- Bake for a full 25 minutes without opening the oven door. Once 25 minutes is up, carefully remove the foil, very large coffee filters or parchment paper by gently lifting it out of the pan, so it comes out without grabbing the shell. Re-poke the holes if they closed up. The holes will keep the pie from puffing up during the next stage.
- Continue baking but move to the center rack and lower the heat to 350 degrees. Set the timer for 10 minutes without opening the oven door. Pie should have dry-ish surface and the top edge should be starting to turn golden brown.
- Add filling and continue baking until pie is baked.
For Fully Prebaked Pie Shells (cream pies)
- Bake for a full 25 minutes without opening the oven door. Once 25 minutes is up, carefully remove the foil, very large coffee filters or parchment paper by gently lifting it out of the pan, so it comes out without grabbing the shell. Re-poke the holes if they closed up. The holes will keep the pie from puffing up during the next stage.
- Continue baking but move to the center rack and lower the heat to 350 degrees. Set the timer for 15-18 minutes without opening the oven door. Pie should have dry-ish surface and the top edge should be starting to turn golden brown.
- Cool the pie shell on a cooling rack and cool thoroughly before filling.
Pro Tip for Sealing Fully Pre-baked Shells
- Remember those holes you poked with a fork around your pie crust? I found you can seal the crust from the moisture of fillings by smearing the smallest amount of cream cheese into the holes, like putty to a tiny nail hole.
- You can also use egg white, by brushing the entire surface with a lightly beaten egg white immediately when the pie comes out of the oven.
Let’s face it, making homemade dough for a pie crust may seem like a challenge. But with this easy homemade pie crust recipe, it’s easier than ever to achieve the perfect pie crust from the comfort of your own home.
Now that you feel confident with all this Pie Knowledge, let’s bake up this easy homemade pie crust recipe for some glorious pies!
Holiday Pies & Desserts!
- 15 Popular Easy Cream Pies You’ll Love!
- Key Lime Cheesecake Pie
- Chocolate Heaven Magic Custard Cake
- Pecan Cheesecake Pie
- The Perfect Cheesecake Experience
- 12 Delectable Pies for the Holidays!
- Ultimate Chocolate Cookies
- 21 Dreamy Cream Pies To Go Ga-Ga Over!
- Raspberry Vanilla Custard Pudding Pie
- Super Easy Homemade Brownies
- Amish Country Pumpkin Custard Pie
- Pretzel Pie Crust
Easy Homemade Pie Crust
Ingredients
- 1 ½ cups all purpose flour
- 1 ½ teaspoons cornstarch
- ½ teaspoon salt
- 8 tablespoons unsalted butter cut into ½ inch cubes (for all butter, omit shortening and use 10 tablespoons butter)
- 2 tablespoons Crisco shortening or lard
- 2 teaspoons white vinegar
- Scant ⅓ cup ice cold water
Instructions
To Start:
- Whisk together the flour, cornstarch and salt in a small bowl.
- Place butter cubes on plate dusted with flour.
- Measure the cold water and add the vinegar to it.
- Place everything in the fridge for 10-15 minutes to chill up.
Making the crust:
- Transfer the dry ingredients to the food processor. Add the butter/crisco, then pulse the machine 6-7 times, until the pieces of fat are roughly the size of small peas.
- Pour the vinegar-water mixture through the feed tube in a 7-8 second stream, pulsing the machine as you add it. Stop pulsing when the mixtureis just starting to form larger clumps.
- Turn the dough out onto your work surface and pack it into a ball. Put the dough on a sheet of plastic wrap and flatten it into a ¾ inch thick disc. Wrap the disc and refrigerate for at least one hour before rolling.
Flatten & Roll the Dough
- Dust your work surface with flour, before you begin rolling the dough. Dust the top of the dough and the rolling pin as needed, to prevent the dough from sticking.
- Rock over the dough a few times with your rolling pin and begin rolling it from the center out. Give the dough a quarter turn, then repeat the rolling sequence and keep repeating. Roll the dough out into a 12-13 inch circle using medium pressure, not too hard and too little.
- For deep dish make it 12 ½ to 13 inches in diameter. For standard 9 - 9 ½ inch pie pan, a 12 inch circle will do nicely.
- If there’s any lingering flour on the dough, once it’s rolled out, take a pastry brush and brush the excess flour off the dough quickly, as the longer the dough stays at room temperature, the more difficult it is to handle.
Turn the Dough into the Pie Pan
- Simply run your hands under the dough, then lift into the pan without stretching and tearing. You can also rest the dough at the end of dough and roll the dough onto the pin. Posting the pin over one edge of the pan, then unroll the dough into the pan.
- Make sure the dough is draped evenly over the pan. Gently nudge the dough down the sides of the pan and crease at the bottom. Do this gradually working your way around as you go. You want an overhang of about ½ inch to ¾ inch all around. Trim with scissors to get a nice even cut.
To Flute the Edge
- Starting anywhere along the edge, taking the overhanging dough and fold it under toward the outside of the pan so any seam is hidden. As you fold, pinch the dough together while you sculpt it into an upright ridge ½ to ¾ inches high. Work your way around the edge until you are done.
- Place the shell into the freezer for 5-6 minutes to firm up the ridge. This helps the flutes to hold their shape easier.
- To create the flute, form a V with the thumb and forefinger of one hand against the outside of the rim. With your other forefinger or thumb, press against the shell from the other side, pushing the dough in the V. Continue around the perimeter. Cover with plastic wrap and refrigerate the shell for 15 minutes minimum before filling or blind-baking.
- If you need to prebake the shell, poke the bottom 7-8 times with a fork. When you poke, twist the fork slightly from side to side to enlarge the holes, as small homes tend to close up when prebaking to vent and allow trapped steam to escape when you remove pie weights or dry beans.
Blind Baking
- Blind baking refers to the process of prebaking the pie shell either partially or fully to set the crust to keep it crusty. Pies that benefit the most for partially prebaking include pumpkin, custard, pecan, chess and sweet potato, just to name a few. Certain pie shells need to be fully prebaked when no further baking is needed for pies, most notably cream pies, where the filling is cooked separately, then added to the shell.
To Weigh Down the Crust
- The first step is to weigh down the crust so it doesn’t balloon up in the oven. If it puffs up, it may not brown properly and it becomes misshapened, so it may not hold the filling.
- Line the shell with foil, very large coffee filters or parchment paper by nudging it evenly into the pan without disrupting the pie shell. Leave the overhang of the foil or parchment paper on opposite sides and fold it down like wings that you can grab and then place the pie pan onto a baking sheet lined with parchment paper. Add enough dried beans or pie weights about 2/3rds full, and level them out evenly, especially up and around the sides.
Baking the Pie Crust
- Before baking, adjust the racks in the oven. One rack should be in the bottom position and another in the middle. Preheat the oven to 375 degrees and make sure you place your pie shell on a baking sheet lined with parchment paper to soak up any leaking butter once it starts baking and to avoid any messes.
- For Partially Prebaked Pie Shells (pumpkin, custard, pecan, chess and sweet potato) bake for a full 25 minutes without opening the oven door. Once 25 minutes is up, carefully remove the foil, very large coffee filters or parchment paper by gently lifting it out of the pan so it comes out without grabbing the shell. Re-poke the holes if they closed up. The holes will keep the pie from puffing up during the next stage.
- Continue baking but move to the center rack and lower the heat to 350 degrees. Set the timer for 10 minutes without opening the oven door. Pie should have dry-ish surface and the top edge should be starting to turn golden brown. If not, bake for 3-4 minutes longer.
- For Fully Prebaked Pie Shells (cream pies) bake an additional 15-18 minutes after the initial bake, instead of 10 minutes until golden brown and crusty. Cool the pie shell on a cooling rack and cool thoroughly before filling.
Notes
- Pro Tip for Sealing Fully Prebaked Shells: Remember those holes you poked with a fork around your pie crust? I found you can seal the crust from the moisture of fillings by smearing the smallest amount of cream cheese into the holes, like putty to a tiny nail hole. You can also use egg white, by brushing the entire surface with a lightly beaten egg white immediately when the pie comes out of the oven.
- For double crust or lattice pies, double this recipe. Divide the dough in half, making one of the halves a little bigger for the bottom crust, since it's a bigger portion to cover.
- Pie dough can be refrigerated for up to 3 days, as long as it’s well wrapped in plastic. Unbaked pie shells can also be refrigerated for up to 3 days.
Recipe from Pie Academy Master the Perfect Crust by Ken Haedrich